Don at the raising of the Hunley
The confederate submarine, the CSS Hunley sunk a few miles off the Charleston harbor 150 years ago. It was the first submarine to sink a ship after it detonated a charge under the union blockade ship the USS Housatonic. In 2000 National Geographic assigned Don to cover the story.
Final illustration of the Hunley for National Geographic
Don spent a week at the lift site and took photos and made sketches of the gear, all custom engineered, that sat on a platform about 6 miles off the coast. After the craft was raised, Don made regular visits to the lab where the mud that filled the Hunley was slowly removed. Each layer removed revealed a new discovery and subsequently altered the illustration.
Fast forward 14 years.
When a new 3D PRINTER arrived in the studio, one of the first test projects for Don to work on was his old friend, the CSS Hunley. It was perfect for the job, being a stand-alone object. It also would be a good demonstration of how he could re-create a historic object.
Step one: Modeling the ship
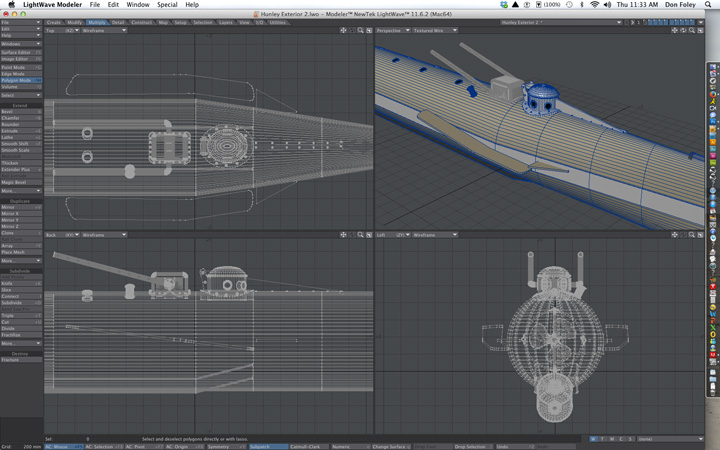
The original illustration was based off a 3D model Don had created in FormZ and rendered in Electric Image. In 2004 Don switch his production to Lightwave 3D. In 2013 a European publication called History Illustrated hired Don to create a new illustration.
Illustration for History Illustrated
While the new illustration was based off a model created in Lightwave, which supports 3D printing, it wasn’t built with 3D printing in mind. The new model would serve as a guide, but Don would have to build a new model from scratch.
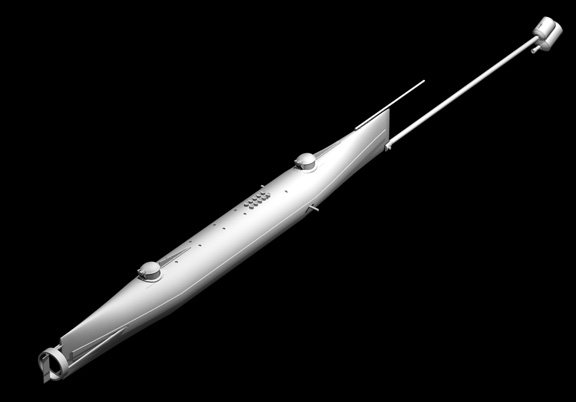
The new Hunley in Lightwave
While the newest version of Lightwave does support 3D printing, it’s not as transparent as simply printing something from the archive. There are two BIG considerations.
#1) Will it print.
Fused Filament printing, the most common type of consumer-level printing, squeezes out a thin strand of melted plastic from an extruder. It builds one level, at a time. It is critical that it has something to print on. Imagine trying to print the letter “T” for instance. The extruder would do fine building the base and the vertical part of the letter, but once it gets to the top, the horizontal part, it would be printing on air. It wouldn’t work. You’d end up with a plastic hairball.
There are a few ways around this.
A) Most commonly, you’d just print the T on its side.
B) You could print with supports. This is extra material that the printer software creates to give an object something to print on. These are removed later. If you have an object like a head, which you couldn’t print on it’s side, you might use supports for the nose, chin and ears.
C) Disssolvable supports. This is a nice idea, and for the first month with his new printer Don focused on this technique. Good in theory, but not very functional for complex models.
D) Build the object in lots of pieces. This is how Don builds his models of complex prints. There are two good aspects of multi-part printing. Each part can be printed with a different material, or they can be painted separately before assembling. If a build goes wrong, you only have to reprint the part that didn’t work right.
#2) Can it print?
Don’s been using Lightwave for 10 years and creating complex models is part of his daily routine. Lightwave is his go-to-tool for modeling, rendering, animation and now for 3D printing. To build a model to print there are things you need to do to insure a successful build.
A) Don’t count on booleans working. Sometimes they will, but not always. Always check each boolean operation for lost polygons or edges that don’t meet. Because Don work with lots of small parts, he uses pegs and divots (mortice and tenons) a lot. Often when the main shape has gotten complicated, doing a subtraction boolean will make the object go wonky. The main thing he does to avoid this is to use a ‘drill’ stencil instead of a boolean. After creating the stencil, he extrudes the face inwards (divot) or outward (peg). This works every time. It also may be possible to “tripple” the object first, then do the boolean.
B) Overlapping objects cause a void. If you have two objects that overlap, a void will be created in the intersection. We’re told this is a common problem in all 3D modeling programs. To avoid this, Don does a LOT of face extrusions to create shapes. He also carefully aligns objects directly next to each other.
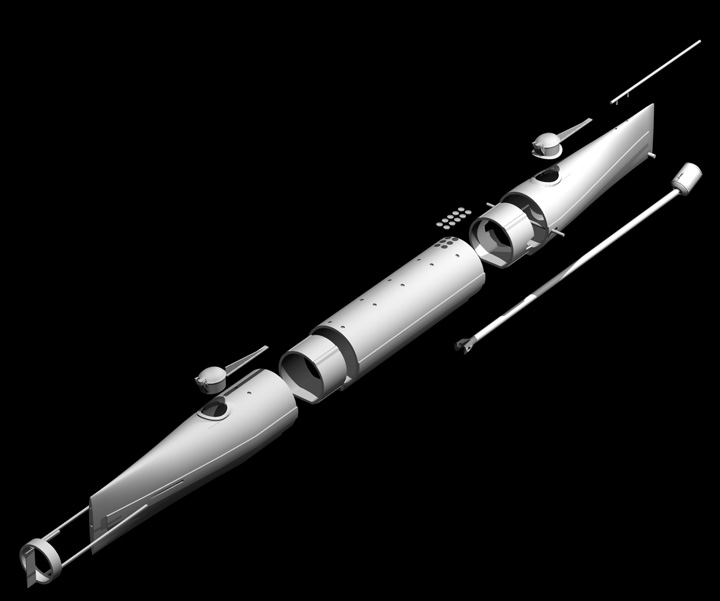
After the big shapes are nailed down, the fun begins. This is what separates 3D modeling for illustrations and 3D modeling for 3D printing. Everything has to work in the real world. To attach objects you make holes or slots one one object with pins or pegs on the other so that they fit together. So the little conning towers on the sub wouldn’t just drop into the sub, for instance, Don made little ledges for them to rest on. The top front spar has two little pegs that fit into two little holes on the hull. The bow has a hole for the long spar yoke to fit over and a small pin brings it all together. A good solution is ‘bisquits’ which fit into holes on two objects. That way you can print flat on a bed, but put holes in the objects. At the same time you print a bisquit that fits in the slots. Because FFF printers squeeze out a layer at a time, there’s some overlap on both the hole and the bisquit, so make the bisquit about 90% the size that would fit ‘perfectly’ in a 3D model.
Once past the learning curve on how to build a 3D model tailored to 3D printing, it becomes pretty natural. Don builds an object in as many pieces that will take, always keeping in mind what the final build platform will look like and making the wall of objects the proper size. Making walls too thick, the object will take longer to print and use more material. Making walls too thin, the object will fail to print properly.
The Hunley assembled in the 3D modeling program
Step two, prepping the build
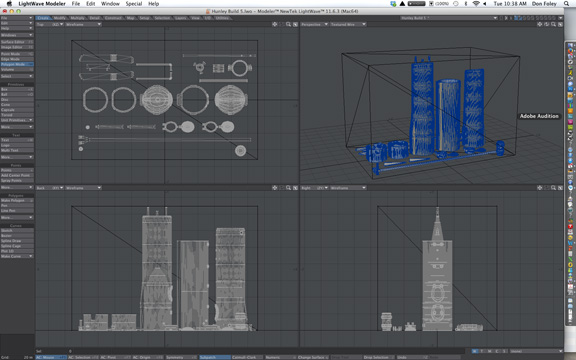
After the model has been constructed ‘in place’ in 3D, it’s time to take it apart put all parts on the virtual ‘build plate.’ Don created a cube that fills the maximum build volume of his printer, he uses this as a template to make sure everything fits.
A screen capture of the virtual build volume
The key thing on re-assembling the object for the final build is to make sure EVERY single point on the bottom of each part is resting exactly on the Z axis. In Lightwave this is actually called the Y axis. When working in Lightwave, placing something on the ground means using the F3 key. It can be the whole object, or just a selected row of points. F3 becomes one of your most used commands pretty quickly and it is critical when assembling the final build setup. When Don has a lot of vertical elements, he tends to stack them in a line on the Lightwave X axis. This is because his printer’s head travels on two bars, left and right, and while watching his printer the thinks this movement has less stress on the machine and also results in a quicker print. After all the ‘short’ stuff has printed, the head spends most of its time going back and forth, left to right. Imagine if the three tall parts were in different corners. After laying down one layer, it would have to travel all the way to the other side of the build to lay down the next layer.
Before exporting, all the faces need to be triangles. In Lightwave this is done by going to Multiply/Triple. Save as a new version before doing this so if you need to edit the model you can work on a non-trippled version.
At this point you export your STL file. This is the format read by all 3D slicing programs. In Lightwave the program performs and automatic diagnosis of your model and lets you know if there are any problems. In most cases it even does the repairs needed. You can examine your STL file with many other tools, such as NetFabb or Meshlab, which are free. Many STL slicing programs also have their own on-board repair options.
Step three, slicing the model
From here we are going to to use Simplify 3D as our slicing and printer control software. There are many programs that can slice and print just fine, and most are open source and free. Simplify 3D is a $140 program and Don likes it because he feels it gives him better control over his prints.
Screen of Simplify 3D with STL file imported
The goal of Simplify 3D is to create an environment for you STL file to setup your final print. It gives you a virtual bed for you to place your object, then you can adjust the settings for how you want your printer to behave while processing your print. After you import your STL file, you can change the location, rotation and scale. You can also duplicate an object if you want to print multiple copies of the same object.
The process screen
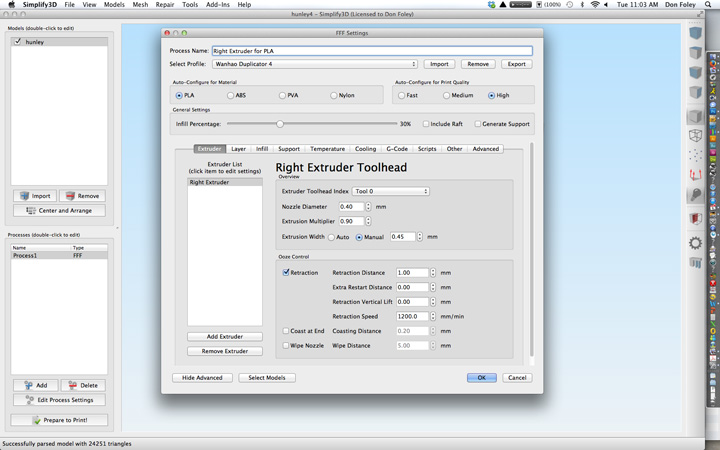
After you finish setting your bed, it’s time to fine tune the settings for the print. The software has pre-set profiles for many printers. Since Don will be printing on his Wanhao Duplicator 4, he uses this pre-set. In this case Don is only printing with one head in PLA, so he custom designed a process based on this. Once you create a process you like, you can save it to use on other prints.
Here are some of the key settings he used for printing the CSS Hunley:
Head temp: 205°
Bed temp: none
Layer height: 0.10 or 0.20
Print Speed: 3600 mm per minute
First layer: Height 90%, speed 25%
Infill: 50%
No rafts, no supports
Don also like to print with an offset berm. This goes down before the final print begins and outlines each part. This way he can insure the bed is level and the filament is flowing properly.
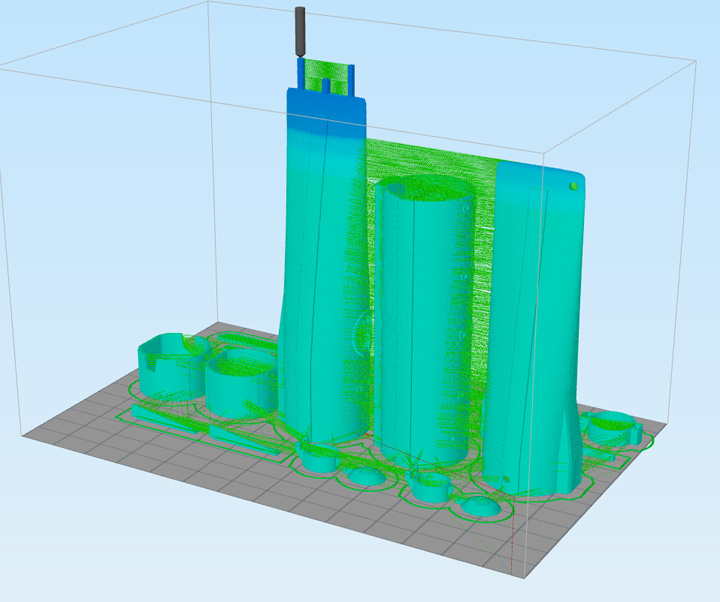
Once done, it’s time to slice the file. With a fused filament printer, each layer is about as thick as a sheet of paper. The program will ‘slice’ each layer, creating a set of information that will tell the printer where to deposit the material on each layer. This can take a while, as it has to calculate the tool path for hundreds, if not thousands of layers. Fortunately Simplify 3D is amazingly fast and takes less than a minute for the Hunley build to slice.
Screen of the tool path, the path speeds are also shown in color. Green is for the faster ‘travel’ path when the printer isn’t extruding
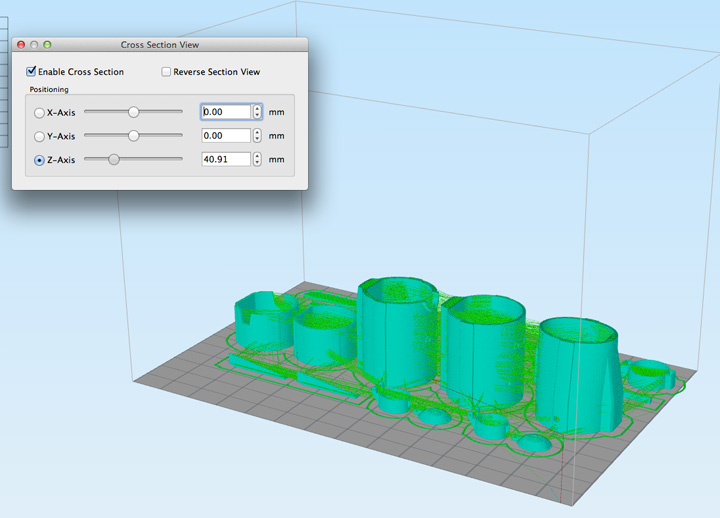
One cool thing with Simplify 3D is that you can view a cross section of the build anywhere you want. This is great for checking for errors, as it shows the exact tool paths the printer will use.
Cross section view
Step four, printing the model
Once done, you are ready to print. There are 3 ways to go. If you have a wireless printer, you can print over WiFi. If you have a printer that has an SD port, you can send your file to an SD card and print from the card. Most printers have a USB port, so you can run a cable to the printer. With Simplify 3D you can have a lot of control and monitoring via USB. Don doesn’t like having his computer running a print, so he uses the SD card.
His Duplicator 4 uses the X3G format to print, so he makes sure the software is set to output in .x3g format. He writes the file to his hard drive and copies it over to the SD card. This way if he wants to run an old print again, it’s ready to go.
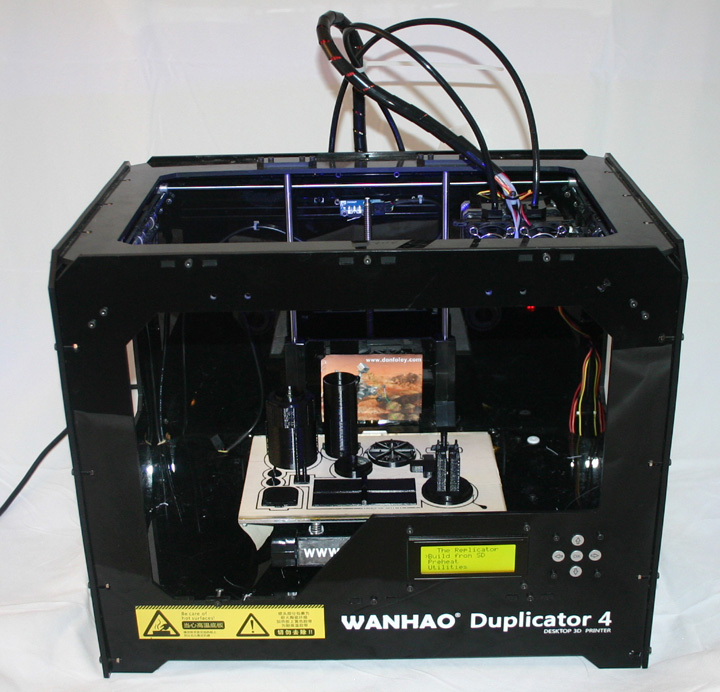
Don bought the Duplicator because it was a good value and he was pleased with the reviews. After several months of working with it, he has no complaints. Printing 100 micron prints in PLA with no bad prints is an every day event. His printer is constantly running and any bad prints usually come from design flaws found in initial proofs. Having looked at prints from a variety of other printers, the Duplicator, the machine easily matches any other FFF process printer on the market at the moment.
Don’s printer, the Wanhao Duplicator 4, here with the Hubble Space Telescope print on the bed
Before printing there are a couple things to do. The most important is to make sure the bed is completely level. The next is to make sure you have a good bed surface. To level the bed, Don uses a sheet of paper or a feeler gauge set at 0.10 or 0.20 depending on the layer height and adjusts the height screws on the bed as needed. Don prints on a glass plate with a Scotch brand painter tape applied to the surface.
After MUCH experimentation, the best formula he has found for 100% successful prints is: Scotch Painter tape (no other brand, blue or green works for him), a quick wipe down of rubbing alcohol, 25% initial layer speed. Don doesn’t print with rafts because his parts need to fit together tightly and the only way to do that is to print flat on the bed. Also he stores his materials when not in use. Each spool is in a zip lock bag with 3 silica gel packs and a humidity strip, all which can be found on Amazon.
Materials
He buys his material from the same vendors because the high quality of their materials. They are Joshua at Makergeeks: http://www.makergeeks.com/ or Carl at 3D Printer Solution: http://3dprintersolutions.us/
Don only prints in PLA, he finds that larger objects in ABS are too prone to curling that result too often in failed prints. He never has a problem printing in PLA, unless its a design issue.
Don bought his Wanhao Duplicator from Makergeeks. In addition to materials he also buys spare parts from 3D Printer Solutions, both offer fair prices and free shipping.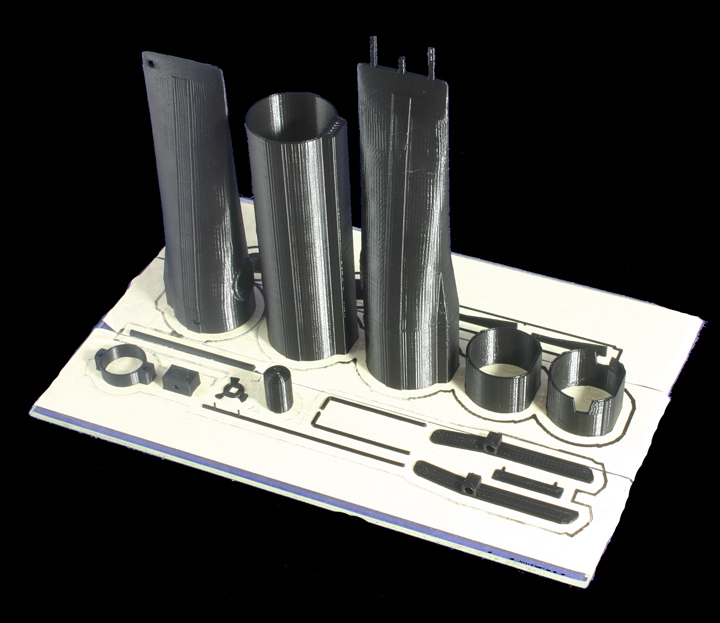
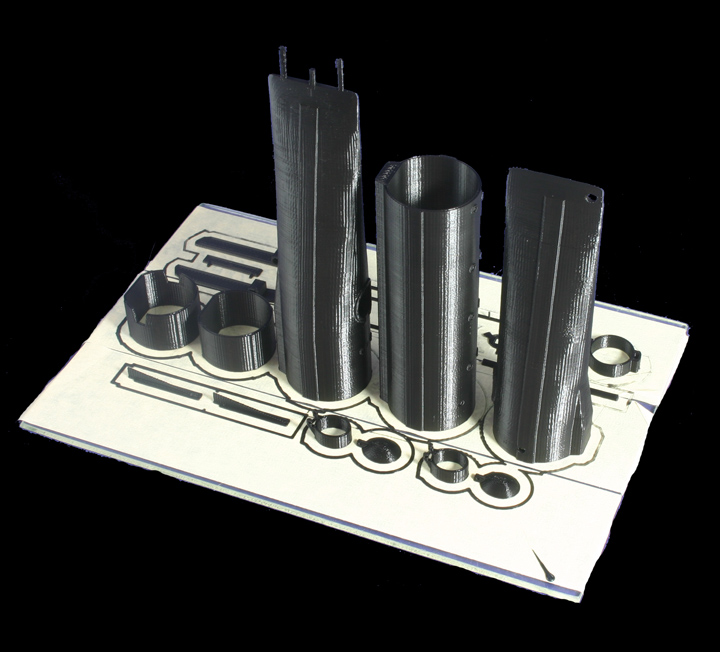
Two views of the print bed for the Hunley
To remove the prints from the bed, Don uses a fish filleting knife. The blades on these are very thin, but very sharp.
Step five, assembling the build
To assemble his final print Don uses Loctite’s Ultra Gel Super Glue. Careful not to get any on your fingers when handling the print, it can easily mark it with ‘fingerprints’ that show up on dark materials.
Diagram on how the craft is put together
When Don creates a model, he also generates an assembly diagram so that anyone who builds on of his prints can see how to assemble it.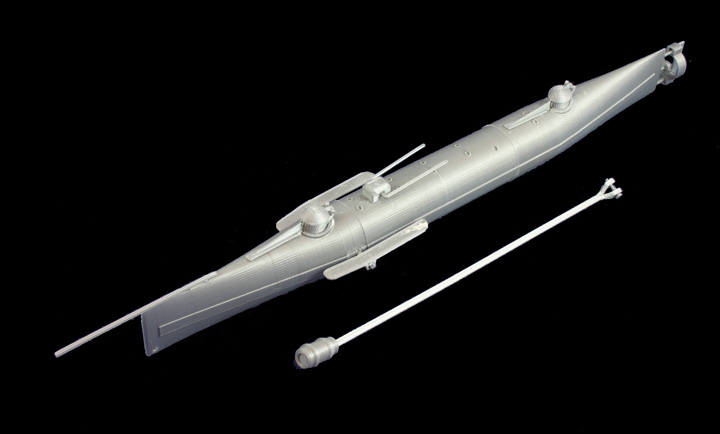
Photo of the final build of the CSS Hunley
The final build was about 2 feet long, with a lot of that being the forespar. The main sections are held together by using sleeve inserts (seen on the left side of the build plate) that have ‘friction ridges’ that keep the ship together.
STL and OBJ files for his object can be purchased at Don’s 3D Print store by clicking on this link.


